为什么储能行业充放电倍率都是 0.5C

· 5 min read
Sarah Chen

很多电化学储能项目(尤其是电网侧、工商业侧的大型电池储能系统 BESS)在参数表上都会出现一个熟悉的数字:0.5C 充放电倍率。看起来好像整个行业都默认了 0.5C,这背后其实是 电芯特性、寿命成本、安全和电网应用场景多方面权衡的结果。

先简单回顾:
0.5C 的含义:

  • 对于容量为 100Ah 的电池,0.5C 放电电流就是 50A;
  • 理论上 2 小时充满或放空,所以 0.5C 往往对应“2 小时制”储能系统。

下面从几个维度拆开讲。


一、电芯物理特性:0.5C 是寿命、安全与效率的“甜点位”​

大型储能现在主流用的是 磷酸铁锂(LFP)能量型电芯,不是动力电池那种高 C 倍率“暴力玩家”。对这类能量型电芯来说:

  1. 寿命在 0.5C 附近最划算

    • 0.25C~0.5C:循环寿命可以轻松做到 6000–10000 次甚至更多;
    • 拉到 1C:同样的电芯体系下,容量衰减明显加快,寿命可能直接打个 7 折甚至更低。
      对于要求 10 年、15 年的电站来说,寿命一旦缩短就是实打实的度电成本上升,所以大家自然会往 0.5C 附近靠。
  2. 发热少,热管理简单、安全边际大

    • 大电流意味着 I²R 损耗急剧放大,发热上去,就要:
      • 更复杂、更贵的冷却系统;
      • 更苛刻的安全设计(热失控防护、绝缘距、电气间隙等)。
    • 0.5C 下发热可控,空调 / 液冷系统压力小很多,安全冗余更宽松,整个系统 CAPEX 也更友好。
  3. 效率更高

    • 低 C 倍率下,内阻损耗小一大截,系统往返效率更高。
    • 对于以“搬运能量”为主的储能(削峰填谷、调峰),效率比瞬时大功率更重要——多赚一点度电收益,远比瞬时多一点峰值功率划算。

综合下来:
0.5C 是“物理上电芯比较舒服”的点,再高就开始明显吃寿命和安全冗余了。


二、电网应用场景:2 小时 / 4 小时制天然推导出 0.5C​

再看应用侧。

电网侧和工商业侧的大部分储能项目,其商业模式/技术要求往往是:

  • 2 小时、4 小时、甚至更长时长的能量型储能,而不是类似电动车那种几分钟内能量爆发完的“动力型”场景。
  • 常见场景:
    • 削峰填谷:白天充、晚上放,或者反过来;
    • 调峰调频:既参与调频,又承担一定峰谷价差套利;
    • 配合光伏、风电做平滑、跟踪计划曲线等。

在这种场景下,很自然就出现:

  • 2 小时制(0.5C):
    • 到底层就是“我有 1MWh 的电,需要以 0.5MW 的功率连放 2 小时”;
    • 0.5C 就是一个“既能参与快速调度,又不会太激进”的折中。
  • 4 小时制(0.25C) 也很常见:
    • 尤其在以储能替代传统调峰机组的场景;
    • 但 0.25C 会拉低短时功率密度,在某些调频场景就略吃亏。

所以行业里你经常会看到:0.25C(4h)、0.5C(2h)、1C(1h)三种主流时长,而其中 0.5C 用得最多,因为它是“能量型”和“功率型”之间的中庸选择。


三、系统成本视角:电池和 PCS 之间的平衡点​

再往系统层做一层算账,就更清晰了。

假设我们要做一个 1MWh 的储能系统,目标是能做日常削峰,也能适当参与调频:

  • 选 0.5C:
    • 电池侧:1MWh 用能量型电芯,单 kWh 价格较低,寿命更长;
    • PCS:按 0.5MW 配置,功率器件、电缆、开关设备等成本适中;
    • 日常功率上也基本够用。
  • 选 1C:
    • 电池侧:能短时间喷 1MW,电芯要用更“凶”的配方或更高额定倍率,单 kWh 成本更高;
    • PCS:要到 1MW,变流器、电气设备成本上升明显;
    • 寿命/发热压力更大,后续维护成本攀升。
  • 选 0.25C:
    • 电池容量翻倍才能达到同样功率要求(比如你还是要求 0.5MW 输出,那系统就要 2MWh),
    • 虽然电芯本身更轻松,但初始 CAPEX 可能撑不住。

现实工程里,大家算来算去:
在“成本 / 寿命 / 功率需求”三者之间,0.5C 最像一个全局最优点,因此逐渐在行业中“固化”为默认值。


四、也不是“全部都是 0.5C”,而是主流标准化在 0.5C​

严格说,“储能行业充放电倍率都是 0.5C”这句话并不完全准确:

  • 电网快速调频、一次调频等场景中,1C 甚至 2C 的系统也存在;
  • 户用/小型工商业储能,很多是 0.5C–1C 可选;
  • 有的厂家会标注:
    • 额定功率:0.5C
    • 最大短时功率:1C(比如 10 秒、30 秒)

只不过,在 大规模电站 / 工商业标准化产品 里,为了简化选型、降本、统一设计,0.5C 被作为“缺省配置”锁死在方案里,看起来就像“全行业都是 0.5C”。


五、小结​

用一句工程师视角的话总结:

0.5C 不是天生的标准,而是电芯、寿命、安全、电网业务和成本综合博弈之后,工程实践自然收敛出来的“行业习惯值”。

  • 对电芯:0.5C 是能量型 LFP 舒服、安全、效率高的工作点;
  • 对系统:刚好对应 2 小时制储能,能满足大多数电网和工商业场景;
  • 对成本:电池 CAPEX、PCS CAPEX 和寿命折损综合下来,总体 TCO 最优附近。

所以你在标书、选型手册、项目方案里看到满眼的 “0.5C”,本质上是在看整个行业在大量项目迭代之后形成的一种现实妥协和平衡。
Content Management in Hugo: Best Practices

· 2 min read
Michael Park

Introduction​

Effective content management is crucial for maintaining a scalable Hugo site. This guide covers best practices for organizing and managing your content.

Content Organization​

Directory Structure​

Create a logical content hierarchy:

Content Structure
content/
├── blog/
│ ├── tech/
│ ├── tutorials/
│ └── news/
├── products/
├── about/
└── docs/

Front Matter Templates​

Use archetypes to standardize content:

archetypes/blog.md
---
title: "{{ replace .Name "-" " " | title }}"
date: {{ .Date }}
draft: true
categories: []
tags: []
featured_image: ""
description: ""
author: ""
---


## Introduction

[Your introduction here]

## Main Content

[Your content here]

Content Types​

Page Bundles​

Organize related content together:

  • Group images with content
  • Manage page resources
  • Maintain content hierarchy

Taxonomies​

Create meaningful content relationships:

config.toml
[taxonomies]
category = "categories"
tag = "tags"
series = "series"
author = "authors"

Content Workflow​

Draft Management​

  1. Creating Drafts

    hugo new blog/my-draft-post.md
  2. Preview Drafts

    hugo server -D
  3. Publishing Content

    • Update front matter
    • Review content
    • Deploy changes

Content Updates​

Maintain content freshness:

  1. Regular Reviews

    • Check for outdated information
    • Update screenshots
    • Verify external links
  2. Version Control

    • Track content changes
    • Collaborate with team
    • Maintain history

Dynamic Content​

layouts/partials/related.html
{{ $related := .Site.RegularPages.Related . | first 3 }}
{{ with $related }}
<h3>Related Posts</h3>
<ul>
{{ range . }}
<li><a href="{{ .RelPermalink }}">{{ .Title }}</a></li>
{{ end }}
</ul>
{{ end }}

Content Reuse​

Create reusable content snippets:

layouts/shortcodes/notice.html
<div className="notice notice-{{ .Get 0 }}">
{{ .Inner | markdownify }}
</div>

SEO and Metadata​

  1. Title Optimization
  2. Meta Descriptions
  3. URL Structure
  4. Image Alt Text

Content Backup​

Backup Strategies​

  1. Version Control

    • Git repository
    • Regular commits
    • Remote backups
  2. External Storage

    • Cloud storage
    • Local backups
    • Asset management

Conclusion​

Good content management practices are essential for maintaining a successful Hugo site. By following these guidelines, you can create an efficient and scalable content workflow.

Resources​

Modbus协议介绍

· 8 min read
天/天 XS

在工业自动化领域,Modbus绝对是个绕不开的名字。作为一个从上世纪70年代末就诞生的通信协议,历久弥坚,默默支撑着无数工厂和设备的互联互通。今天咱们就来聊聊Modbus这个工业通信的元老级协议。


Modbus的历史发展​

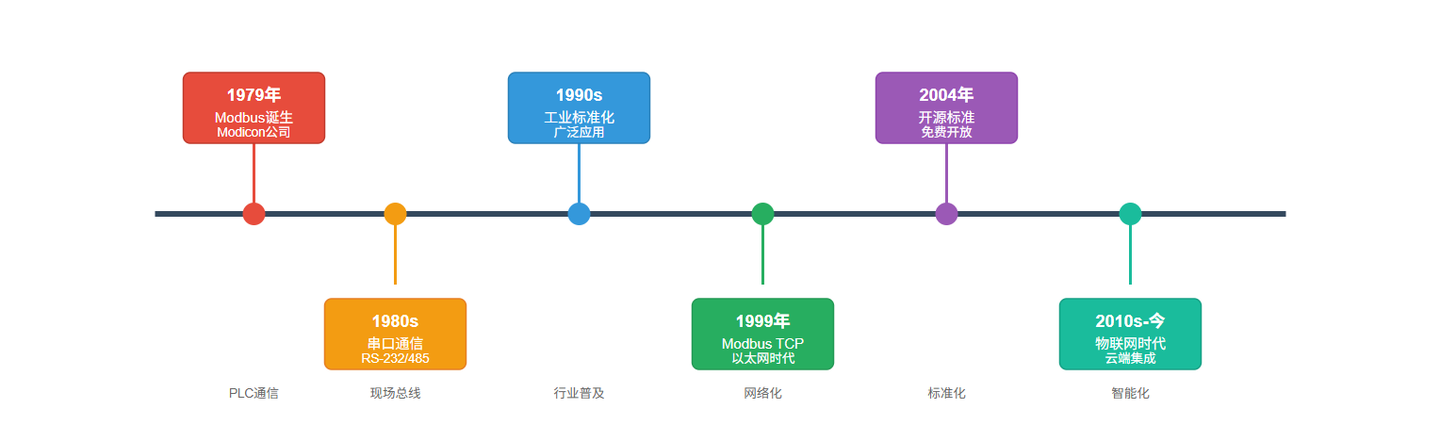
1979年,Modicon公司(也就是现在的施耐德电气前身)推出了一款专为可编程逻辑控制器(PLC)设计的通信协议,这就是Modbus。当时的工业现场,设备之间的通信还停留在电压或电流信号的原始阶段,比如用高低电平表示开关状态,或者用0-10V、4-20mA来传递模拟量数据。Modbus的出现,就像给这些设备装上了翻译器,让PLC和现场设备能更高效地对话。

Modbus协议发展时间线

Modbus是现场总线(Fieldbus)协议的鼻祖。现场总线是什么?简单来说,它就是工业网络的通信方式,能让多个设备通过一对线缆连接到控制器,省去了点对点接线的麻烦。过去每加一个传感器就得拉一根线,布线成本和复杂度跟蜘蛛网似的,而现场总线就有点像WiFi,把设备们都连到一个网络里,省时省力。

除了Modbus,工业领域还有Profibus、DeviceNet、ControlNet等一堆现场总线协议,但Modbus凭着简单易用、开源免费的特点,成了最普及的工业协议之一,至今在全球工厂里依然随处可见。


Modbus设计​

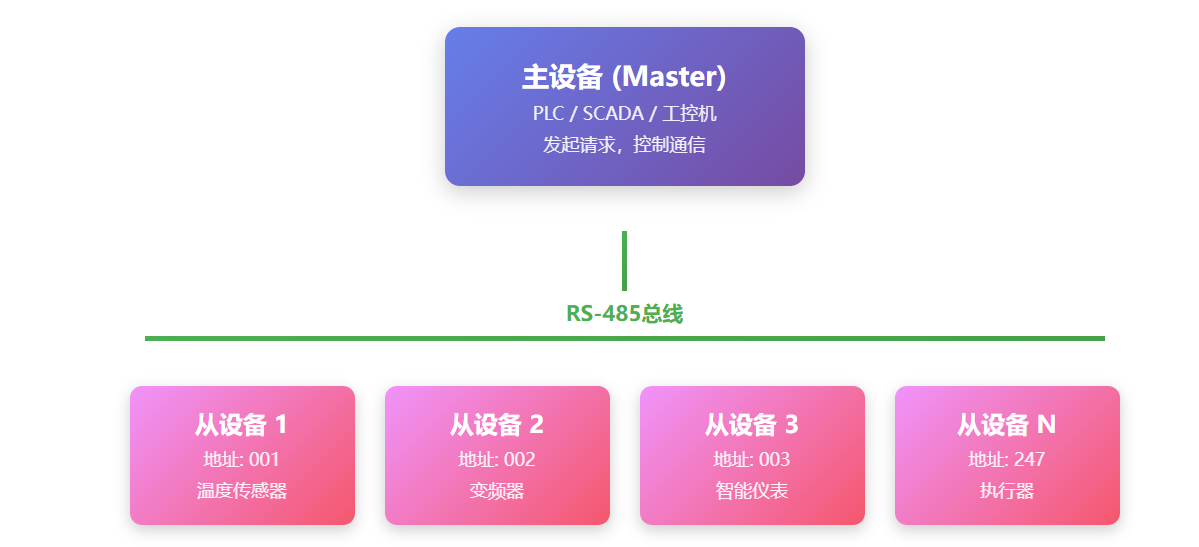
Modbus主从通信模型

Modbus的设计初衷是让PLC和现场设备顺畅交流。最初它跑在串口通信上,比如RS-232或RS-485,速度慢但够稳定。后来随着网络技术发展,Modbus也升级成了支持TCP/IP和以太网的Modbus TCP,适应了现代工业网络的需求。

Modbus 的核心是个 主从通信模型:一个主设备(Master)发号施令,多个从设备(Slave)老老实实响应。主设备可以是 PLC、SCADA 系统或者一台工控机,从设备可能是传感器、变频器或者其他智能仪表。主设备主动发起请求,比如读取数据或发送控制命令,从设备根据请求返回数据或执行操作,整个过程清晰明了。

Modbus数据类型

数据方面,Modbus 支持两种基本格式:

  • 离散量:也就是单个 bit,表示开关状态,比如 0/1、真/假。
  • 寄存器:16 位字,通常存数值,比如温度、压力,或者其他需要表达的复杂数据。

这种简单的数据组织方式,让 Modbus 既能应对简单的开关控制,也能处理复杂的数值传输,适应性极强。


Modbus数据传输​

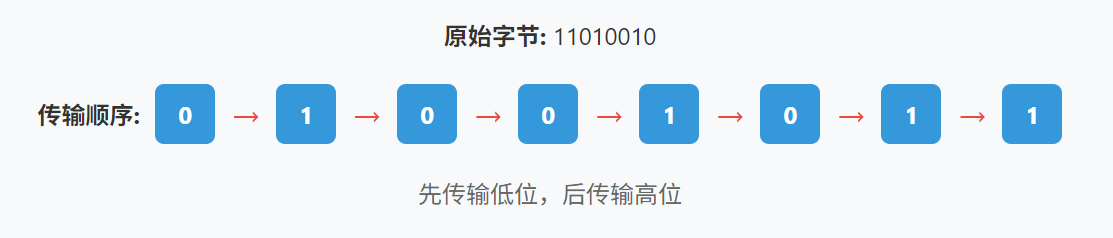
Modbus 的数据传输有自己的套路,了解这些细节对调试和排错至关重要。拿最基础的位传输来说,Modbus 按 先低位后高位 的顺序发送比特(LSB to MSB)。比如有个字节是 11010010,实际传输时会拆成单个比特,按 0、1、0、0、1、0、1、1 的顺序依次发送。

位传输顺序 (LSB to MSB)

为什么要这么讲究?因为接收端得按同样的规则解码,才能确保数据不乱套。这就像调试串口时得先确认波特率、奇偶校验和停止位一样,Modbus 的位序就是类似的基础约定。

至于字节传输,Modbus 根据具体实现方式(RTU、ASCII 或 TCP)会有不同处理,待会我们会细聊。


地址和功能码​

Modbus 的通信离不开 地址 和 功能码,这两者就像指挥系统的大脑和指令集。

设备地址​

每个从设备都有一个独一无二的地址,通常从 1 到 247。主设备发送请求时,会在消息中带上目标从设备的地址,确保命令发到正确的设备。这就像你用快递寄包裹,得写清楚收件人地址,不然包裹可就送错地方了。

寄存器地址​

Modbus寄存器地址映射

Modbus 里的数据按类型存放在不同寄存器里,常见的有:

  • 线圈(Coils):从 00001 开始,存开关量,读写都行。
  • 离散输入(Discrete Inputs):从 10001 开始,存只读的开关量。
  • 输入寄存器(Input Registers):从 30001 开始,存只读的数值。
  • 保持寄存器(Holding Registers):从 40001 开始,存可读写的数值。

通过指定寄存器地址,主设备就能精准地读写目标数据。比如,想读取某个温度传感器的值,可能就要访问 30001 号输入寄存器。

功能码​

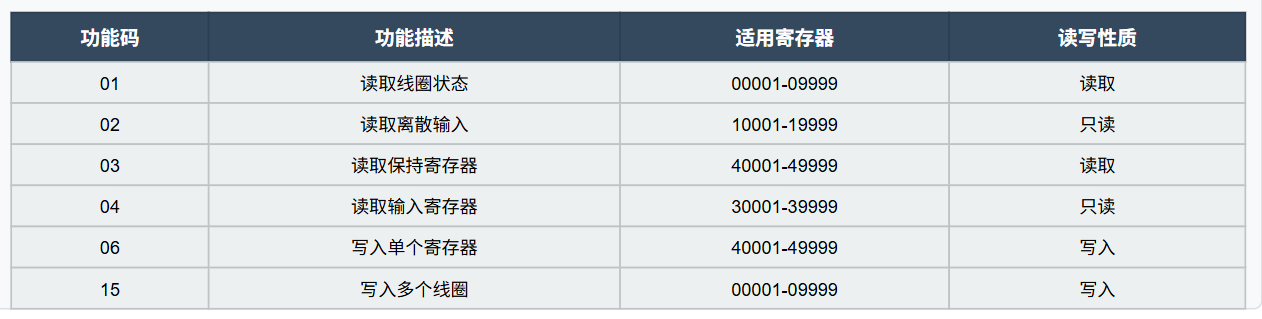
功能码告诉从设备该做什么。

常用功能码

主设备发送的消息帧里会包含设备地址、功能码和寄存器地址,从设备收到后根据功能码执行相应操作。这就像嵌入式开发中,单片机收到上位机的指令后,解析命令字然后执行对应动作。


Modbus 的三种实现​

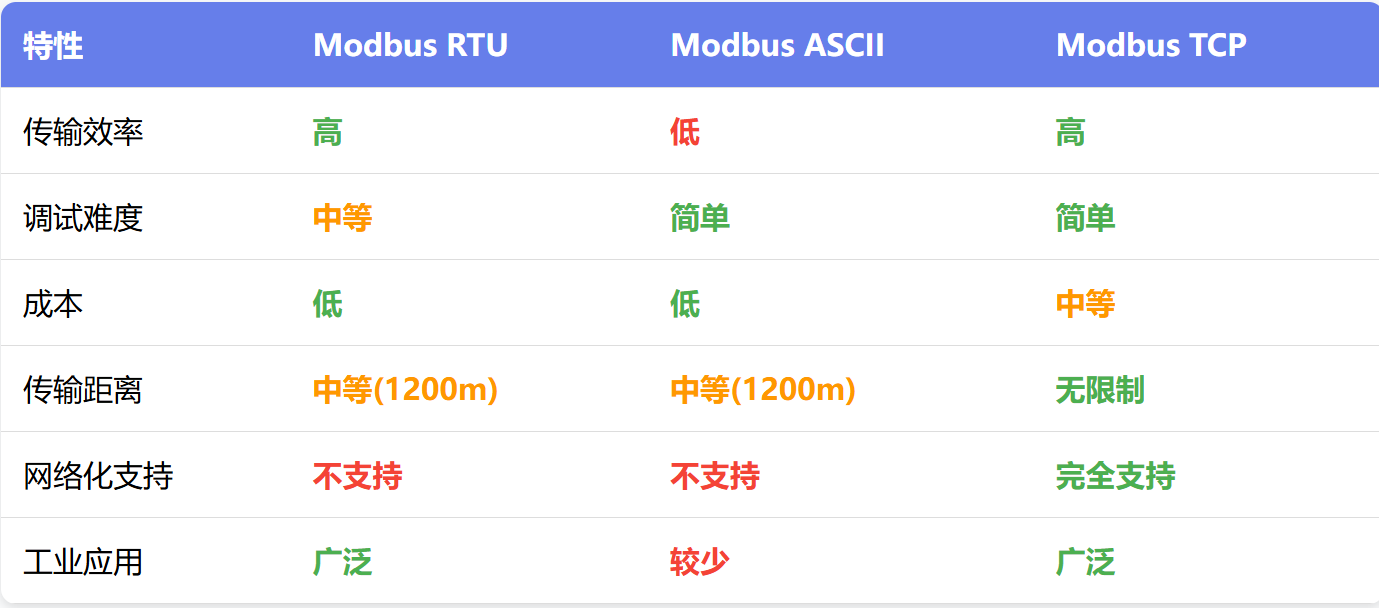
Modbus三种实现方式对比

Modbus 有三种主要实现方式:RTU、ASCII 和 TCP,每种都有自己的特点和适用场景。

Modbus RTU​

Modbus RTU 消息帧结构

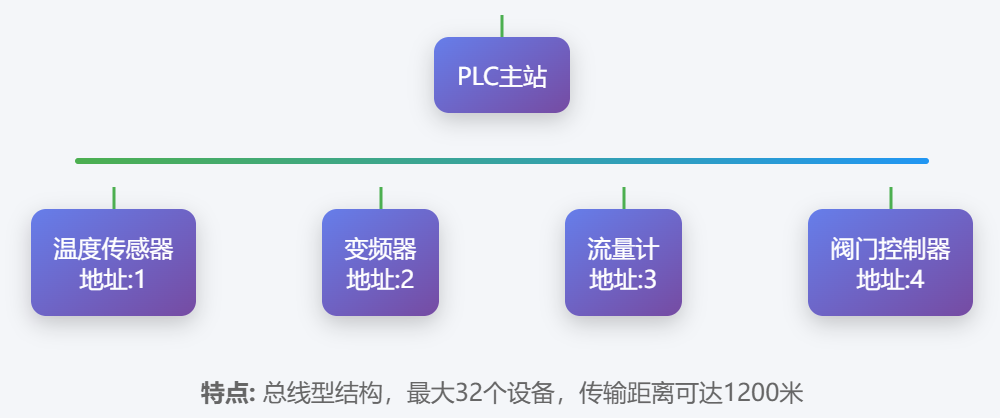
RTU(Remote Terminal Unit)是 Modbus 的经典实现,特别适合串口通信,比如 RS-232 或 RS-485。RS-485 尤其常见,因为它支持长距离传输(上千米)和多点通信,抗干扰能力也强,非常适合工厂里设备分散的场景。

RTU 用二进制编码,消息帧紧凑,包含设备地址、功能码、数据和 CRC 校验。效率高、速度快,但对时序要求严格,调试时得格外注意波特率和帧间间隔。

Modbus ASCII​

Modbus ASCII 消息帧结构

ASCII 模式用可读的 ASCII 字符(0-9、A-F)表示数据,每个字节拆成两个字符发送。比如二进制数据 0xAB 会变成 ASCII 的 41 42。消息帧以冒号(:)开头,回车换行结尾,适合需要人眼调试的场景。

但 ASCII 模式消息长、传输慢,效率远不如 RTU,实际工业现场用得少,多见于一些老旧设备或者教学场景。

Modbus TCP:拥抱以太网​

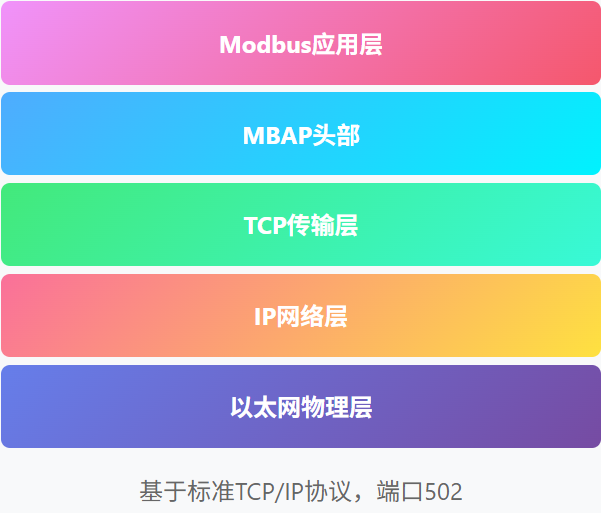
Modbus TCP 协议栈

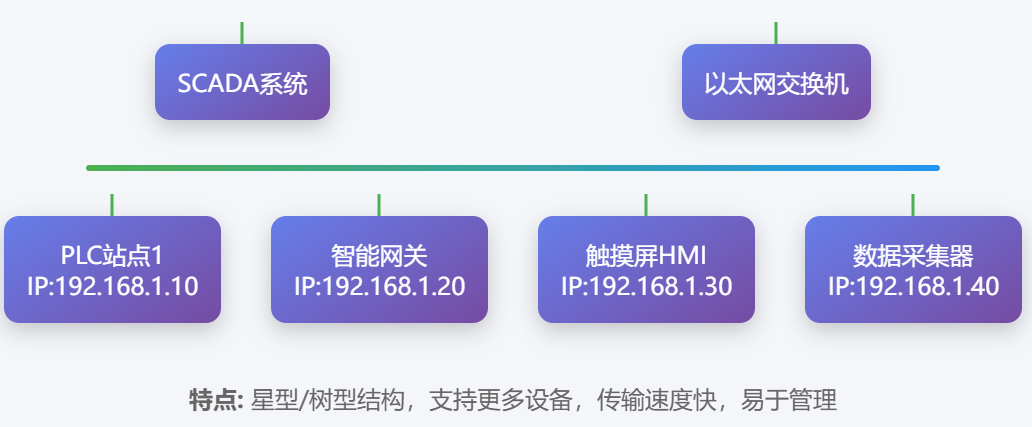
TCP 模式是 Modbus 的以太网版本,基于 TCP/IP 协议,跑在标准以太网 infrastructure 上。相比串口,TCP 速度快、距离远,还能轻松接入企业网络,特别适合现代化的 SCADA 系统或远程监控。

Modbus TCP MBAP头部结构

TCP 消息帧去掉了 CRC 校验(因为 TCP 协议自带可靠性保证),增加了 MBAP 头(Modbus Application Protocol Header),包含事务标识、协议标识等字段。很多新能源项目,比如光伏电站的逆变器监控,就喜欢用 Modbus TCP,方便和云端系统对接。

Modbus为什么能成功​

Modbus的成功离不开它的简单和开放。协议设计直白,学习曲线低,工程师随便翻翻文档就能上手实现。它的开源免费属性也让厂商无需支付授权费,降低了成本。很多中小型工厂,设备老旧,预算有限,但是借助Modbus,串口转TCP的网关一接,老设备也能接入现代网络。

RS-485 总线拓扑

Modbus TCP 网络拓扑

当然,Modbus也有短板,比如数据吞吐量低,实时性不如一些现代协议(比如EtherCAT)。但在很多场景下,比如环境监控、简单设备控制,它的稳定性和易用性完全够用。

在工业通信的江湖里,Modbus或许不是最快的,也不是最先进的,但它绝对是最实用、最可靠的老朋友。

Optimizing Hugo Performance: Speed Up Your Site

· 2 min read
Sarah Chen

Introduction​

Performance is crucial for user experience and SEO. In this guide, we'll explore various techniques to optimize your Hugo site for maximum performance.

Asset Optimization​

Image Optimization​

Images often contribute the most to page weight. Here's how to optimize them:

layouts/shortcodes/optimized-image.html
{{ $image := .Page.Resources.GetMatch (printf "%s" (.Get "src")) }}
{{ $options := dict "targetWidth" 800 "quality" 85 }}
{{ $processed := $image.Process "resize 800x webp q85" }}
<img src="{{ $processed.RelPermalink }}"
alt="{{ .Get "alt" }}"
loading="lazy"
className="rounded-lg shadow-lg">

CSS and JavaScript​

Minimize your asset footprint:

  • Minify CSS and JavaScript
  • Bundle assets appropriately
  • Remove unused code

Caching Strategies​

  1. Browser Caching

    • Set appropriate cache headers
    • Use versioned assets
    • Implement service workers
  2. Hugo Caching

    • Use .Scratch for expensive operations
    • Cache partial results
    • Implement memoization

Content Delivery​

CDN Setup​

config.toml
[params.cdn]
enable = true
provider = "cloudfront"
domain = "cdn.example.com"

Edge Computing​

Leverage edge computing for faster content delivery:

  • Deploy to multiple regions
  • Use edge functions when needed
  • Implement geo-routing

Performance Monitoring​

Key Metrics​

  1. Core Web Vitals

    • Largest Contentful Paint (LCP)
    • First Input Delay (FID)
    • Cumulative Layout Shift (CLS)
  2. Additional Metrics

    • Time to First Byte (TTFB)
    • First Contentful Paint (FCP)
    • Total Blocking Time (TBT)

Advanced Optimization Techniques​

Resource Hints​

layouts/partials/head.html
<link rel="preconnect" href="https://fonts.googleapis.com">
<link rel="preload" href="/fonts/main.woff2" as="font" type="font/woff2" crossorigin>

Critical CSS​

Inline critical styles for faster rendering:

layouts/partials/critical-css.html
<style>
/* Critical CSS here */
.hero { /* ... */ }
.nav { /* ... */ }
</style>

SEO Optimization​

  1. Structured Data
  2. XML Sitemaps
  3. Meta Tags

Conclusion​

Optimizing your Hugo site is an ongoing process. Regular monitoring and adjustments ensure your site maintains peak performance.

Resources​

Deploying Hugo Sites: A Complete Guide

· 2 min read
Alex Johnson

Introduction​

Once you've built your Hugo site, the next step is deploying it to make it accessible to the world. This guide covers various deployment options and best practices.

1. Netlify​

Netlify offers a seamless deployment experience:

terminal
# Create netlify.toml
[build]
publish = "public"
command = "hugo --gc --minify"

[build.environment]
HUGO_VERSION = "0.95.0"

2. Vercel​

Vercel provides excellent performance and analytics.

3. GitHub Pages​

Perfect for project sites and personal blogs:

github-workflow.yml
name: GitHub Pages

on:
push:
branches:
- main

jobs:
deploy:
runs-on: ubuntu-latest
steps:
- uses: actions/checkout@v2
- name: Setup Hugo
uses: peaceiris/actions-hugo@v2

Deployment Best Practices​

  1. Use Version Control

    • Track your changes
    • Collaborate effectively
    • Enable automated deployments
  2. Optimize Assets

    • Compress images
    • Minify CSS/JS
    • Enable caching
  3. Configure CI/CD

    • Automate builds
    • Run tests
    • Deploy automatically

Performance Considerations​

  1. Page Load Speed

    • Optimize images
    • Minimize HTTP requests
    • Use CDN
  2. SEO

    • Configure meta tags
    • Create sitemap
    • Enable robots.txt

Security Measures​

  1. Enable HTTPS
  2. Configure Headers
  3. Implement CSP

Conclusion​

Choosing the right deployment platform and following best practices ensures your Hugo site is fast, secure, and reliable.

Resources​

Customizing Your Hugo Theme: A Deep Dive

· 2 min read
Jane Smith

Introduction​

While Hugo comes with many beautiful themes, you'll often want to customize them to match your specific needs. This guide will walk you through the process of customizing your Hugo theme effectively.

Understanding Hugo's Theme Structure​

Before diving into customization, it's important to understand how Hugo themes are structured.

Basic Theme Customization​

1. Colors and Typography​

The easiest way to start customizing your theme is by modifying the CSS:

assets/css/main.css
:root {
--primary-color: #007bff;
--secondary-color: #6c757d;
--font-family: 'Inter', sans-serif;
}

body {
font-family: var(--font-family);
color: #333;
}

2. Layout Modifications​

You can override any layout file from the theme by creating a matching file in your site's layouts directory.

Advanced Customization Techniques​

Creating Custom Shortcodes​

Shortcodes are a powerful way to add custom functionality:

layouts/shortcodes/custom-alert.html
<div className="alert alert-{{ .Get 0 }}">
{{ .Inner | markdownify }}
</div>

Working with Partials​

Partials help keep your code DRY and maintainable:

layouts/partials/custom-header.html
<header className="site-header">
<nav>
{{ range .Site.Menus.main }}
<a href="{{ .URL }}">{{ .Name }}</a>
{{ end }}
</nav>
</header>

Best Practices​

  1. Don't Edit Theme Files Directly

    • Create overrides in your site directory
    • Use Hugo's lookup order to your advantage
  2. Maintain Compatibility

    • Test your customizations across different devices
    • Keep accessibility in mind
  3. Performance Considerations

    • Optimize images and assets
    • Minimize CSS and JavaScript

Common Customization Examples​

Custom Homepage Layout​

layouts/index.html
{{ define "main" }}
<div className="homepage">
{{ partial "hero.html" . }}
{{ partial "featured-posts.html" . }}
{{ partial "newsletter.html" . }}
</div>
{{ end }}

Custom Taxonomy Pages​

layouts/taxonomy/category.html
{{ define "main" }}
<div className="category-page">
<h1>{{ .Title }}</h1>
<div className="posts-grid">
{{ range .Pages }}
{{ partial "post-card.html" . }}
{{ end }}
</div>
</div>
{{ end }}

Conclusion​

Customizing your Hugo theme allows you to create a unique website that stands out. By understanding Hugo's structure and following best practices, you can make modifications that are both effective and maintainable.

Further Resources​

Getting Started with Hugo: A Beginner's Guide

· 2 min read
John Doe

Introduction​

Hugo is one of the most popular open-source static site generators. With its amazing speed and flexibility, Hugo makes building websites fun again.

Why Choose Hugo?​

Here are some compelling reasons to choose Hugo for your next project:

  1. Lightning Fast
  2. Easy to Learn
  3. Highly Flexible
  4. Great Community

Setting Up Your First Hugo Site​

Let's walk through creating your first Hugo site:

terminal
# Create a new Hugo site
hugo new site my-awesome-site
cd my-awesome-site

# Initialize git and add a theme
git init
git submodule add https://github.com/theNewDynamic/gohugo-theme-ananke themes/ananke

# Add the theme to your configuration
echo "theme = 'ananke'" >> config.toml

# Create your first post
hugo new posts/my-first-post.md

Working with Content​

Hugo makes content creation straightforward. Here's how to organize your content effectively.

Advanced Features​

Hugo comes with many advanced features out of the box:

  1. Taxonomies: Categories and tags
  2. Shortcodes: Easy way to add complex content
  3. Custom Outputs: JSON, AMP, etc.
  4. Asset Processing: SASS/SCSS, PostCSS

Code Examples​

Here's an example of a simple Hugo template:

layouts/_default/single.html
{{ define "main" }}
<article>
<h1>{{ .Title }}</h1>
<time>{{ .Date.Format "2006-01-02" }}</time>
{{ .Content }}
</article>
{{ end }}

Conclusion​

Hugo provides an excellent foundation for building modern websites. Its combination of speed, flexibility, and ease of use makes it a great choice for projects of any size.

Next Steps​

GridBeat 1.0.0 新版发布

· One min read
John Doe

发布​

基于正式发布。

致谢​

向我们所有开发人员,赞助者和贡献者表示特别的感谢!

完整 Changelog​

自最新发布以来所有的变更历史,都可以浏览这个页面 。

反馈​

欢迎给本版本提供反馈。欢迎到 GitHub issues 创建新 issue 或者给我们的邮件列表之一发送邮件, 或者到我们新建立的 bbs 讨论。

下一个版本​

下一个版本的 计划在十月初发布。向所有的支持者、贡献者和用户表示感谢!